Ryan's Graduate Software Development Blog
A blog created by a hard-working and dedicated developer.
Monday 24 September 2012
C++ Console Dictionary Merger Program
A couple of months ago, I wrote a program as part of a programming test, the test was to write a console program that could take 2 dictionary files (ANSI text files) and output a 3rd, that contains the words from both dictionaries in alphabetical order, with duplicates removed, for more information look at the Downloads page.
Sunday 5 August 2012
Visual Binary Tree Winforms Application
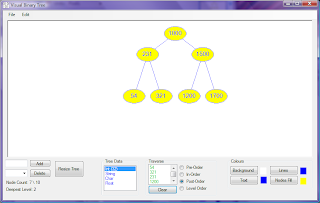
Last year I created a Winforms application that uses 2D graphics to display binary trees, I have recently revisited it to make several improvements and bug fixes. The binary tree is compiled as a DLL, which is used by the application which has the following features:
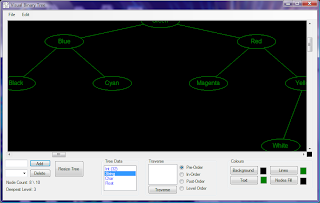
Here are some screenshots of the application (click to zoom):
The program demonstrates the following:
You can download the executable as well as the source by going to the downloads page.
- Node Insertion & Deletion
- All Modes of Traversal
- Customize-able Colour Scheme
- Saving & Loading of Either Colour Scheme or Tree
- Node Encryption When Saved to File
Here are some screenshots of the application (click to zoom):
The program demonstrates the following:
- Dynamic Programming & Reflection (Requires .NET 4)
- 2D Graphics (GDI+)
- Generics
- Class Constraints
- File Handling (CryptoStream)
- LINQ
You can download the executable as well as the source by going to the downloads page.
Tuesday 17 July 2012
XML to LINQ
For this blog post I'll be visiting the subject of using XML in .NET, in particular I'll be focusing on a single example and examine the different ways the same result can be achieved
The XML that will be the main focus of this post contains a list of football teams and a few players that play for these teams, the XML looks like this:
Lets look at the simplest method, firstly the root node needs to be created, then inside the root node each Team can be added:
means that each Team the query returns is added as a child element to Teams. To add the Players to each team, a list of Player element nodes needs adding to the inner XElement (children of each Team element) for each Team evaluated by the query, and the team ID needs to be matched to the ID referenced by each Player, the following shows the complete query:
Please note that the following namespaces need to be referenced to execute the above code: System.Linq & System.Xml.Linq.
The XML that will be the main focus of this post contains a list of football teams and a few players that play for these teams, the XML looks like this:
<Teams>
  <Team Name="Manchester United">
    <Player>Valencia</Player>
    <Player>Rooney</Player>
    <Player>Young</Player>
  </Team>
  <Team Name="Barcelona">
    <Player>Messi</Player>
  </Team>
  <Team Name="Chelsea">
    <Player>Lukaku</Player>
  </Team>
  <Team Name="Real Madrid">
    <Player>Alonso</Player>
    <Player>Pepe</Player>
  </Team>
  <Team Name="Inter Milan">
    <Player>Pazzini</Player>
    <Player>Sneijder</Player>
  </Team>
  <Team Name="Bayern Munich">
    <Player>Robben</Player>
  </Team>
</Teams>
The classes and class fields that will represent the nodes will be as follows:
class Player
{
    public string Name { get; private set; }
    public int TeamID { get; private set; }

    static public Player[] CreateArray(string[] playerNames, int[] teamIDs)
    {
        Player[] arr = new Player[playerNames.Length];

        for (int i = 0; i < arr.Length; ++i)
            arr[i] = new Player { Name = playerNames[i], TeamID = teamIDs[i] };

        return arr;
    }
}

class Team
{
    public int ID { get; private set; }
    public string Name { get; private set; }

    static public Team[] CreateArray(string[] teamNames)
    {
        Team[] arr = new Team[teamNames.Length];
        int id = 1;

        for (int i = 0; i < arr.Length; ++i)
            arr[i] = new Team { ID = id++, Name = teamNames[i] };

        return arr;
    }
}
Then the data can be created by using the static CreateArray methods for each class as follows:
string[] teamNames = new[] {"Manchester United", "Barcelona", "Chelsea",
 "Real Madrid", "Inter Milan", "Bayern Munich" };

string[] playerNames = new [] {"Valencia", "Rooney", "Robben",
    "Pazzini", "Messi", "Alonso", "Young", "Pepe", "Lukaku", "Sneijder"};
int[] playerTeamIDs = new[] { 1, 1, 6, 5, 2, 4, 1, 4, 3, 5 };

Team[] teams = Team.CreateArray(teamNames);
Player[] players = Player.CreateArray(playerNames, playerTeamIDs);
An ID is defined for each team, and an ID for each player which acts as the foreign key, which creates a one-to-many relationship between a team and its players. The static methods are there so it is possible to create several teams and players without having to create each one individually.Lets look at the simplest method, firstly the root node needs to be created, then inside the root node each Team can be added:
new XElement("Teams", from team in teams
       select new XElement("Team", new XAttribute("Name", team.Name)));
The XElement constructor accepts an arbitrary number of XML entities, meaning that passing in a query as a parameter which returns an IEnumerable
XElement teamPlayersXML = new XElement("Teams", from team in teams
                                                    select new XElement("Team", new XAttribute("Name", team.Name),
                                                        from player in players
                                                        where player.TeamID == team.ID
                                                        select new XElement("Player", player.Name)));
The query translates roughly into the following (fluent syntax):
XElement teamPlayersXML = new XElement("Teams",
            teams.Select(t => new XElement("team", new XAttribute("Name", t.Name),
                players.Where(p => p.TeamID == t.ID)
                       .Select(p => new XElement("player", p.Name)))));
Now lets look at how grouping can be used to produce the same XML, this is done by first joining each Player with each Team using the IDs as the key. Now the Players can be grouped into each Team, using an enumeration of objects of a class that implements the generic ILookup interface (that in turn implements the generic IEnumerable interface with the generic argument being a generic IGrouping which specifies both the element and key type as type arguments), then each grouping can be enumerated as follows:
XElement teamPlayersXML = new XElement("Teams", from team in teams
                                                join player in players
                                                on team.ID equals player.TeamID
                                                group player by team into grp // Bind each groping into grp (team & player will no longer be in scope)
                                                select
                                                    new XElement("Team", new XAttribute("Name", grp.Key.Name),
                                                        from g in grp // enumerate each Player stored in a group
                                                        select
                                                            new XElement("Player", g.Name)));
The equivalent in fluent syntax is as follows:
XElement teamPlayersXML = new XElement("Teams", teams.Join(players, t => t.ID, p => p.TeamID, (p, t) => new { p, t })
                                                     .GroupBy(x => x.p, x => x.t)
                                                     .Select(x => new XElement("Team", new XAttribute("Name", x.Key.Name), x.Select(pair => new XElement("Player", pair.Name)))));
As you may have already guessed, the first method is much faster since no grouping is being used. Now here is the first query using an iterative approach rather than using LINQ:
XElement root = new XElement("Teams");
XElement currentElement = null;

foreach (Team team in teams)
{
    currentElement = new XElement("Team", new XAttribute("Name", team.Name));

    foreach (Player player in players)
    {
        if (player.TeamID == team.ID)
            currentElement.Add(new XElement("Player", player.Name));
    }

    root.Add(currentElement);
}
Using a System.Diagnostics.Stopwatch to compare the first LINQ query to the iterative method. It is actually the iterative method that executes faster, on my machine the LINQ method takes ~1.9ms, while the iterative approach takes ~0.5ms (I also tested with 1,000 Teams and 11,000 Players and the LINQ method took ~225ms while the iterative method took ~205ms). This is most likely due to the extra overhead when executing the query that is adding to and returning an enumeration as well as iterating it when adding each child node.Please note that the following namespaces need to be referenced to execute the above code: System.Linq & System.Xml.Linq.
Tuesday 10 July 2012
Simple Binding in WPF
For the last few weeks I have been learning WPF and I decided to introduce the concept of binding in WPF.
What is it?
In its most simple form, binding is a technique used to synchronize one property with another either on the same element or on two completely different elements. The Binding class is what is known as a Markup Extension class, in XAML these are defined by the use of curly braces when set as an attribute of an element - it allows the use of positional and named parameters as with .NET attribute definitions, or by using property element syntax (defining an XAML attribute as an XAML child element). Let's take a look at an example of binding the content on a label to the text on a textbox:
When an item is selected, the background of the selected item will be set to the background of the ComboBox itself, but no item is originally selected so the background will be originally set to null (completely transparent). To fix this I will use the FallbackValue property when binding, this allows us to specify a value will be set if binding to the specified path fails (in this case it fails because SelectedItem is initially null). Because there is no simple string value that converts into a complex LinearGradientBrush (the default background of a ComboBox and other Windows controls), the binding on the background can be created by using property elements, this means properties can have more complex values, here is how it is done:
What is it?
In its most simple form, binding is a technique used to synchronize one property with another either on the same element or on two completely different elements. The Binding class is what is known as a Markup Extension class, in XAML these are defined by the use of curly braces when set as an attribute of an element - it allows the use of positional and named parameters as with .NET attribute definitions, or by using property element syntax (defining an XAML attribute as an XAML child element). Let's take a look at an example of binding the content on a label to the text on a textbox:
<StackPanel Width="200" xmlns="http://schemas.microsoft.com/winfx/2006/xaml/presentation">
  <TextBox Name="txt"/>
  <Label Content="{Binding ElementName=txt, Path=Text}" />
</StackPanel>
The binding class has a default constructor, but it also has a constructor that accepts a single parameter - the string for the property path, so here is a better way of writing the binding string above, using Path as the positional parameter, and ElementName as the named parameter:
<Label Content="{Binding Text, ElementName=txt}" />
You can use the Path property the same way you access properties in code (eg. List.Count), the folloowing example shows this in action as well as binding to a property on the same element:
<StackPanel Width="200" xmlns="http://schemas.microsoft.com/winfx/2006/xaml/presentation">
  <ComboBox Background="{Binding SelectedItem.Background, RelativeSource={RelativeSource Self}}">
    <ComboBoxItem Background="Red">Red</ComboBoxItem>
 <ComboBoxItem Background="Green">Green</ComboBoxItem>
 <ComboBoxItem Background="Blue">Blue</ComboBoxItem>
  </ComboBox>
</StackPanel>
Notice that the value of the RelativeSource property is in curly braces, this is because RelativeSource is also a Markup Extension class, where the positional parameter Mode is set to Self.When an item is selected, the background of the selected item will be set to the background of the ComboBox itself, but no item is originally selected so the background will be originally set to null (completely transparent). To fix this I will use the FallbackValue property when binding, this allows us to specify a value will be set if binding to the specified path fails (in this case it fails because SelectedItem is initially null). Because there is no simple string value that converts into a complex LinearGradientBrush (the default background of a ComboBox and other Windows controls), the binding on the background can be created by using property elements, this means properties can have more complex values, here is how it is done:
<StackPanel Width="200" xmlns="http://schemas.microsoft.com/winfx/2006/xaml/presentation">
  <ComboBox>
    <ComboBox.Background>
      <Binding>
        <Binding.Path>SelectedItem.Background</Binding.Path>
        <Binding.RelativeSource>
          <RelativeSource Mode="Self"/>
        </Binding.RelativeSource>
        <Binding.FallbackValue>
          <LinearGradientBrush StartPoint="0,0" EndPoint="0,1">
            <GradientBrush.GradientStops>
              <GradientStopCollection>
                <GradientStop Color="#FFF" Offset="0.0"/>
                <GradientStop Color="#CCC" Offset="1.0"/>
              </GradientStopCollection>
            </GradientBrush.GradientStops>
          </LinearGradientBrush>
        </Binding.FallbackValue>
      </Binding>
    </ComboBox.Background>

    <ComboBoxItem Background="Red">Red</ComboBoxItem>
    <ComboBoxItem Background="Green">Green</ComboBoxItem>
    <ComboBoxItem Background="Blue">Blue</ComboBoxItem>
  </ComboBox>
</StackPanel>
Now the ComboBox will have its default background colour again until an item is selected.
Subscribe to:
Posts (Atom)


